Monday, January 26, 2009

Frame Around the Pic


Ok, I have been sad to have "frameless" pictures on my blog. See when I upload pics into blogger, they automatically make it clickable, but sometimes I don't want clickable...so I just do <img src="http://the name of my pic.jpg"> (see this How-to if you are confused. The problem is, that cute little frame goes away.

BUT I have found that if I do a CSS code instead of an HTML code, it works with minimul changes.

This is the code for the picture above:
<img style="margin: 0px auto 10px;" src="https://blogger.googleusercontent.com/img/b/R29vZ2xl/AVvXsEiC2MHMELd0z0qH1fdm1oeeU1Yy7WwMNsUSsX0vwo5hBpMqpyPauMCM-ZdAf1FHyvIbN0UvTbrj96OdtfUhJvqN1PxqiEkrw3ve0FlinegOrYHXLNWsorjCm94L40G4TL_V-Q7Ogsm2W4s/s400/waterbuffalo.jpg" />

It is the "margin: 0px auto 10px;" after the img style (instead of img src).

Have I totally confused you? Drop me a line and let me know if this is as clear as mud and I'll try to verbalize better, okay?

Friday, January 23, 2009

Linking Revisited

I was asked the following question by noexcuses today: "I'm a newby. Can you tell me how to turn a word into a link back to Coffee Bean, or another location?
I've never done it, and it would be great to reference another's blog when I write something, enabling the reader to click on that blog, rather than just trying to remember the blog name, or writing down on one's arm...."

Good question!

There are two ways on blogger to add links.

The first way is for you to do the code by hand. The code for a link is <a href=http://noexcuses318.blogspot.com/ target="new"> No Excuses - Musings of a Procrastinator</a>

The "<" and ">" tags start and end each phrase of HTML. The "a href=" is where the link will go. You put that around the words you want your readers to read. Then you end the code with a "/" sign.

The target="new" means that a new window will open with the other person's blog, but your blog will still be open on their screen too. This helps them to not lose where they came from, and to let them go back to reading the rest of your blog when they are done looking at the other person's blog.

So you will do the <a href="where_ever_you_want_to_link_to" target="new">What Ever Word You Want Linkable</a>

If this is completely unclear, take a look at this post that I did awhile ago. You won't be trying to make a button, which is mostly what this post is about, but it does explain the "a href" thing in detail.

The other way is this: when you are writing your blog post, highlight the word you want to have be a clickable link like this:


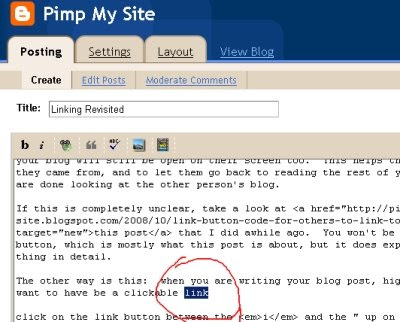
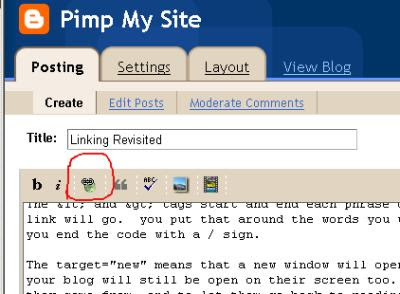
then click on the link button (kind of a greenish icon) between the i and the " up on the toolbar:
"

Add the link address, making sure that it looks like this:

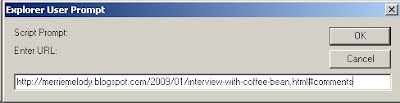
Make sure that there is only one http:// and that the address that you want to have linked to is cut and pasted so that there are no mistakes in the addy. (Cutting and pasting addresses is done by highlighting the address in the address bar and clicking "copy" and then pasting into the address box, like above.)

That is it! It is a lot easier than it sounds! So just play around with which ever method you like best, and it will soon be second nature!

If you have any questions, be sure and ask it in the comments and I'll clear it up, okay?

Monday, January 12, 2009

Lessons Learned Over the Holidays

There are a couple new things with my blog that I have worked on lately that I am excited to share with you.

The first was learning how to change the background, the "outer wrapper", and the header to change the look and feel. I wanted a new look for Christmas, but have been disappointed with the loading time of some of the cute backgrounds I've seen on other's blogs. Not to mention, when I visited the site to choose the cute look, my computer crashed. So, I took matters into my own hands, using free backgrounds I've found on the 'net. Below are the three for the holidays, and you can see my current look by visiting MerrieMelody.blogspot.com. Also, I have posted the links to the backgrounds I used on the sidebar.


The second was to create a table within a blog post (shown below). This made me sooo excited because it gave me extreme control over posting pics and words together in a way that I wanted without having to make it an image that would take forever to load for viewers. It allowed me to have my pics and words on a separate background color, too, enhancing the visual effect of it all.


Weekends.


Sleeping late.


Enjoying friendships.


Eating junk food.


Working on projects.


Playing games.


Reading books.


Worshipping.


Fellowshipping.


Relaxing.


Early to bed.


Monday.


So, over the next week or two, I will be discussing each of these sections separately: Creating a header, finding and changing the background and "outer wrapper" of a blogspot blog (I'll have to look separately at my wordpress blog and see if I can do the same thing there), and creating a table within a blog post.

Stay tuned!