Tuesday, October 21, 2008

Adding Images

We are going to now learn how to add images. We will be creating a new .html page. You can look back at previous explanations of how to do something if you have forgotten.

First of all, I want you to create a folder for your webpage info. Do this by going to "My Documents" and right click somewhere on the white screen. Choose "New" and then "Folder". Name it "My Webpage" when the folder is first displayed, then hit enter. Double click on the newly created file, "My Webpage" to open the file.

Now open "Notepad" (remember how to do it? click on start, all programs, accessories, and open notepad). Let's save it now. Where it says, "Save in" up at the top, navigate to "My Documents" and find "My Webpage" and click on it. Let's call the file webpage1.html and be sure to save it as an "all files". If you need a refresher course, look at "Basic HTML 1"

Let's put a title our webpage. Let's simply call it "My Webpage", by opening the title tag, entering the title, and closing the tag, like this: <title> My Webpage </title>

Then we'll open our body tag, hit enter several times, and put a close body tag, like this: <body>


</body>

We will then put our information in between those two tags, within the body itself. Let's keep the background white, for now, and have the text be navy blue. Let's look up the color code by visiting: http://www.computerhope.com/htmcolor.htm

Scroll down until you see "Dodger Blue 4", and let's copy and paste the color code, starting with the # and including the six numbers and letters that follow it. Please visit the site yourself and find the color code.

On "webpage1.html", right below the open body tag, enter the font tag by writing <font color="#153E7E"> and then right above the close body tag, close the font tag by entering: </font>

Now, we are going to go to Merrie Melody and save an image from there. Let's copy my "Merrie Melody/Pimp My Site" logo located in the upper left hand corner of my blog page. Move your mouse over the logo and right click on it. Click on "save picture as". Again, navigate to "My Documents" and find "My Webpage" and click save. The picture name is "avatar.jpg". Since we now have our .html document and our picture together in the same file, we can now attach our picture on our webpage.

Between the open and close font tags, put the text "Merrie Melody Avatar:" <br> and then we will add the image code to display the picture on our webpage. The image code is: <img src="avatar.jpg"> So you will see: Merrie Melody Avatar:<br><img src="avatar.jpg"> That <br> will create a break so that the avatar pic and the text are on separate lines. You could also write a <p> instead of the <br> to create a double space.

Let's see what it looks like now. Let's save our work. Now go to "My Documents". Click on "My Webpage". Within that file you will see your webpage1.html and avatar.jpg. Click on webpage1.html

You can add other pictures to your webpage that you have on your own computer by finding the picture, pull it up in internet explorer, right click on it, click "save picture as" and direct it to My Documents\my webpage and saving it by a name. Add the picture name between the parenthesis in the tag: <img src=" "> img src stands for image source.

That is all there is to it! As long as the picture is located in the same file as your webpage, that will always be the code.

Now, if you want to link to someone elses picture that is already on the 'net, you will put in a URL address.

To find the address, let's go back to my avatar on http://merriemelody.blogspot.com/
Again, move your cursor over my avatar in the top left hand corner of the page. Right click on your mouse, but this time you're going to choose "Properties". You will see Address (URL). Copy and paste the entire URL starting with http:// and ending with .jpg.

If we enter that info in between the image source tag it will bring up the avatar to look the same as the avatar in our file. Let's try it:
<img src="http://3.bp.blogspot.com/_W-
3mdqA0N_s/SOqirhPk_tI/AAAAAAAAAqY/0lzYPNlQgYY/S220/avatar.jpg">

Now save your work and take a look at the webpage. No matter where your image is, if you have the full URL address you can see the image.

See you next time!

Friday, October 17, 2008

Font faces, sizes, & colors

Last time I said that next we'd "learn how to put content onto your pages: writing code to change fonts and text sizes and text color and adding images to your pages, just by using html.", but I think I'll do images next time, okay? It is just a lot of material to cover. So let's get started!

First, go back into your .html file that you worked on last time. Remember that to get back to your notepad page so that you can make changes to your code, you first click on the internet explorer looking icon that is labeled as WhateverYouSavedItAs.html. When it is opened and you see your black page, right click anywhere on the black screen and click on "View Source". Voila! There is your notepad page again!

Ok, lets add content in between the <body> </body>. Add spaces between the opening and closing body tags simply by hitting the "enter" key a few times.

Great! Now we're going to play with font colors and text. The first thing that you should be aware of, is that not everyone has the cool fonts that you do on your computer. Your computer might be able to pull up "chiller" or "Bradley Hand ITC", but other people might not. The standard fonts that people have are: Arial, Times New Roman, Comic Sans MS, and most likely Verdana. You can add an alternative code if there is a text that you really want to use, but be sure to make allowances for others. For instance, if you really want Bradley Hand ITC, but arial will do in a pinch, write: <font face="Bradley Hand ITC, Arial">. Go ahead and try it, but let's make sure to specify a font size and color while we're at it. Let's put in <font face="Bradley Hand ITC, Arial size="9" color="#ffffff"> PUT SOME WRITING </font>

You listed the font that you wanted by telling it the "face" you wanted it to have, the "size" you wanted (I often don't write this one, except for a title), and the "color" that you wanted. With black as a background it forces us to choose a font color since default is black, and the default text simply will not show up on a black background.

You can play around with the text by going into microsoft word and picking out a text that you want to try out. Just remember that most of the fancy scripts will not show up, so always add an alternate like Arial, Times New Roman, Comic Sans MS.

If there is time when you need a specific font, say for a logo for your web business, or a header for your blog, you will need to make an image specifically using that font. I'll show you how to do that later, but I just wanted you to know.


One great thing about being able to change the code as you are working in a sentence is that you can <font color="#f70909"> call attention to some words</font> while leaving the rest alone.

You can <font size=+4> really make them stand out</font>

or <font size=-1> downplay them a bit</font> (this one didn't work well here, but it will on your .html page. Try it there, ok?)

You can also <b>bold a word</b>

<i>Use Italics</i>

<center>
Center something (this works for images, too!)
</center>

<strike>strike something out</strike>

<u>underline</u>

If you have a question about how to do a certain something with the fonts, just submit a question in the comments section & I'll find out and let you know, ok?

Steve, my dh, just commented and added that: <span style="background-color:yellow;">will highlight words</span>

That is all we'll do for today, but be sure to play around with it just a bit. It is one of the most basic codes you'll use.

Have a great day!

Thursday, October 9, 2008

Basic HTML 1

Hi! I have found that I need to set a timer for working on this blog because I could get *really* carried away. So, I have set my timer for 30 minutes. Let's go!

Since there aren't any questions, I thought I'd show you just a little bit about HTML.

First of all, I want you to open up "Notepad" on your computer. If you haven't ever used "Notepad", you'll find it by going to the "Start" button and look at what automatically pops up. If it doesn't show up, click on "All Programs". It will be in your "Accessories".

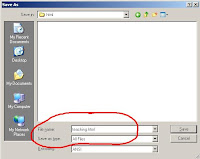
I want you to save it with whatever name you want, but then end with .html and choose: "all files" when it says, "save as type". Click below to enlarge the pic so that you see what I mean:


Ok, after you have saved that file, let's go back into that same Notepad application and learn some HTML.

First off, I want you to title your html practice.

Name it whatever you want, and then put <your title> around it. Mine is called: <title>Teaching HTML</title> This title will show up at the tippy top of your page when it is displayed. Here is how to write the code:


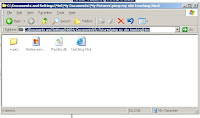
Go ahead and save it again. Let's go look at what you've done so far. Go to where you saved your file. You are going to see an Internet Explorer icon with your file name.html on it. Go ahead and click on the pic below and see what the file looks, like. Mine is called "teaching.html":


Click on yours and you will see the title that you choose way up at tippy top of the screen on the blue area. Do you see it? Mine is in the pic below, just click to see it.


One really important thing to note, is that once you close all of the tabs for your work, you will need to know how to get back into your .html file to edit it, or work on it, some more. To get back to work, do just as you did above: Go to where you saved your file. Click on your html project which appears to be an internet explorer icon. Then, when your html page that you are working on comes up, right click on any part of the page and click "view source". There is your Notepad that you can then edit and save more work.

Ok, we'll work on what is in the body, which is the content of your page.

Now add <body> below the title. and then hit enter a few times and then add </body> Have you noticed that in one bracken you open, then in another you close? The / means to close.

For every code in html that you open, you must also close it or else the web browser will not be able to read it propery.

After you put the body code there, opened and closed, between those tags we will add whatever content our hearts desire.

It is also in the body tag that you can color your entire page. The internet sees color as numbers & letters, followed by a number sign. For example, black is #000000, or six zeros after the # key. White is #ffffff or six f's after the # key. Every color is represented by numbers and letters listed after the # sign.

So let's go back to your <body> tag and change it to look like this: <body bgcolor=#000000> bgcolor stands for "background color"; it will be the color of the entire page. Save your document again, and click in the internet explorer .html icon again. Voila! Your page should be all black.

Here is how the HTML code should look:


There are lots of places out there to find colors. Here are two I found after googling for: "html color codes"
http://www.computerhope.com/htmcolor.htm
http://ific.uv.es/~gonzalez/webtutor/makapage/pics/net216-2.gif

You can go ahead and click on those links without worrying about navigating away from this page because I have set in my code to open a new browser window when you click on the links.

That is all I have time for today, but go and have fun with it!

Tomorrow we'll learn how to put content onto your pages: writing code to change fonts and text sizes and text color and adding images to your pages, just by using html.
Have a great day!

Tuesday, October 7, 2008

Disclosure / Privacy Policy

Dear Friends,

I have added Google AdSense to my blog to give you even more opportunities to find ways to enhance, or pimp, your site.

Please be aware that Pimp My Site does not expressly promote any individual business being advertised on this site.

The following is a Privacy Policy for advertising with Google AdSense on this site:

Google, as a third party vendor, uses cookies to serve ads on this site.

Third party advertising companies may use information, not including your name, address, email address, or telephone number) about your visits to this and other websites in order to provide advertisements about goods and services of interest to you.

If you would like more information about this practice and to know your choices about not having this information used by these companies, click here.

I hope that you find the Google AdSense ads a valuable resource.

Add a Playlist !

Another cool thing that I added to my own site at my MerrieMelody blog was a playlist. I can't tell you how much fun I had creating it and then listening to it for hours. I am a simple person, with simple pleasures!

There are some people that simply don't like listening to song on a blog, and that consideration has to be weighed when you are trying to decide whether or not to add one, but I *love* mine and am happy that most of the comments I've gotten about mine have been positive.

There are many, many free playlists out there as you can see by this google search, but the one I used was at Playlist.com. It was pretty easy to use and had most of the songs I was looking for. They give you a few color options, too, so you can match the playlist icon to your blog/site design.

Let me walk you through the process.

To start an account, create your signin with your login name and password.

From there, you start creating your playlist, adding songs to your heart's content. I often used google and amazon.com to help me remember the song name I was looking for.

When you are finished adding all the songs you desire, click on "my playlists" located at the top of the page.

Click on the option, "Add your playlist to your myspace!"

Then click option, "Get the playlist code for MySpace, Facebook, Blogger, hi5 or any other site!"

Then you will see: "1. Where do you want to put your playlist?" Scroll down and you'll see the options: a. MySpace, b. facebook, c. gaia online, d. friendster, and e. Get the code for any other social network, blog or your own personal website.

Click on the one appropriate for you. I'll talk you through option e.

At Step #2, click on the playlist you have created.

At #3, choose whether or not you want random shuffle, autostart, and choose your color. After you are finished choosing, click on "Get Code!" Then copy this info and paste it into the appropriate place on your site. With blogger, you can add it as a sidebar gadget under the heading of "HTML/JavaScript". Paste it, save it, and voila! You have a playlist on your site!

Step #4: Listen to your playlist and update it as often you'd like!

Have fun!

Monday, October 6, 2008

Link Button Code for Others to Link to Your Blog (A.K.A. Linky ( Link ) Love )

"Linky ( link ) love is linking, usually unsolicited, to a site you enjoy, admire, or find useful." (source: http://www.blogossary.com/define/linky-love/)

Today Maren called me and asked how to set up a link button that gives others the code to add to their blogs to link to her. I found the code and modified it to her blog. So this is how it looks on her site:


  • SahmSisters.com/blog
    Link to Me


This is how to do it for yourself:


<ul>
<li><a href="http://www.sahmsisters.com"><img alt="SahmSisters.com/blog"
border="0"
src="http://4.bp.blogspot.com/_hOmRNkkjNEc/SOpWyJQ
nI6I/AAAAAAAAASQ/oY2FB6zSRMg/s200/sahmsisters+button
.jpg"/></a> <br/> Link to Me<br/>
<textarea rows="10" cols="15" name="html">
<a href="http://www.sahmsisters.com/"><img
src="http://4.bp.blogspot.com/_hOmRNkkjNEc/SOpWyJQ
nI6I/AAAAAAAAASQ/oY2FB6zSRMg/s200/sahmsisters+button
.jpg" source="blank"/></a></textarea>
</li></ul>


Now let's break it down just a bit, okay?

We are going to pay close attention to the parts that say, <a href= > and <img src= > okay?

The "a href" means that address is our destination. Whatever address we put in there will be where the link "clicks" to. So for SahmSisters, their destination is: <a href="http://www.sahmsisters.com/"> For yours, it will be whatever addy is displayed in the address bar of your blog, ok? I suggest copying and pasting that address, just so that you don't miss any slashes or letters. So copy and paste the address, including it all in "quote marks". Add your complete addy to all of the places that have <a href="http://www.sahmsisters.com/> Be sure to replace your address with SahmSisters' every time you see it in the code.

This paragraph added 10/22/08
One more thing that I remember now (several weeks later) to tell you: if you do want to be able to link to a friend, but don't want people to have to leave your page to do it, add target=new in the <a href=> tag, this is how it will look:
<a href="TheURLtoYourLinkMate" target=new>

There is one other place you'll need to fill in. It is the <img src= > spot. That stands for image source, or the address where that picture is located. Understanding how to find the picture name after you have uploaded it to your blog can be a little tricky, but will be easy after you do it a couple of times.

Upload your picture somewhere on your blog. It doesn't matter if it is uploaded as a sidebar gadget or directly in a post. Once you see it on your blog, move your curser directly over the picture and right click with your mouse. One option you will see is "Properties", that is the one to choose. You will see a lot of info about the picture including its size and dimensions, but we want to pay attention to the Address/URL. Highlight everything from http:// to the ending of .jpg .gif .whatever, okay? Then paste that address into the spot on our linky form that says, <img src=" "> make sure that your picture addy is included in the "quote marks" just like in <a href=" "> That is all there is to it!

Then just save it the way that you do any other "gadget" on your blog and see if it works. If it doesn't, open the "gadget" back up and see if you added the right img src= address and a href= address. If you simply can't get it after trying, I'll be happy to look at your code and see what went wrong, okay?

Helping you have FUN with your site!

This site will be dedicated to helping people just like you to add "stuff" to your site to custom fit it for your liking.

Ask questions in the comments field, and I will find the answers for you!

It's time to have FUN with your site!